How to Finish a Table (and use it everyday)
I previously did a blog on how to get a perfect finish in a dusty shop. In that blog (and video) I give a step by step process for applying Osmo to your wood table or project. The Osmo is an absolutely beautiful finish, however I found the durability left something to be desired. Over time it wasn’t uncommon to get water spots or marks from hot dishes. I have also tried Odie’s Oil extensively and found the results to be too inconsistent for me. Odie’s would almost always look amazing for me the day after finishing. However, essentially every piece I ever finished with Odie’s dried out or had other negative reactions with the wood in four to eight weeks or less.
I have had a lot of success with conversion varnish in terms of durability. But conversion varnish has a lot of downsides. It requires a clean shop to spray professionally, it looks synthetic, and it can’t be repaired in place. I wanted to get a finish that protected as well as CV, but was as versatile as Osmo.
I had heard good things about Rubio Monocoat over the years, but only used it on small pieces. Recently I gave it another shot and it performed extraordinarily well on a sample piece. So I did more research and more tests. Eventually getting a step by step Rubio application process from a local maker, Stumptown Reclaimed. He is a very talented professional woodworker that has tried all the finishes and only uses Rubio. He also has dozens (maybe hundreds) of tables out in the real world getting used and abused by real families. The process I am going to give you is based on one that he generously shared with me. With only a slight alteration at the end that I was able to get directly from Rubio. Rubio does make a variety of colors and products. Unless otherwise stated I am using Rubio Plus Pure 2C.
the tools
Festool sander and photography light stick.
The actual process of applying Rubio is pretty easy, basically wipe on, wipe off. The sanding and preparation is what will separate the exceptional pieces from everyone else… and a lot of my projects start with a great epoxy; I recommend Superclear Liquid Glass Deep Pour Epoxy.
I used to say that you can get the same finish from a cheap orbital sander that you can get with a premium sander like my brushless Festool orbital. While I still think it is possible, I realize that it will be much more difficult. If you are a 5-6 projects a year woodworker, stick with an inexpensive orbital like one from Makita. If you are an every weekend (or more) woodworker, I say save up and get yourself a great orbital sander when you can afford it. Until then, the very least you can do is purchase some decent sandpaper from someone like Mirka. That will get you a lot further than the Home Depot stuff. Oh, you will also want a $700 HEPA vacuum to hook to your $500 sander for dust/cancer free sanding. This woodwork stuff can get expensive fast!
it starts (and ends) with sanding
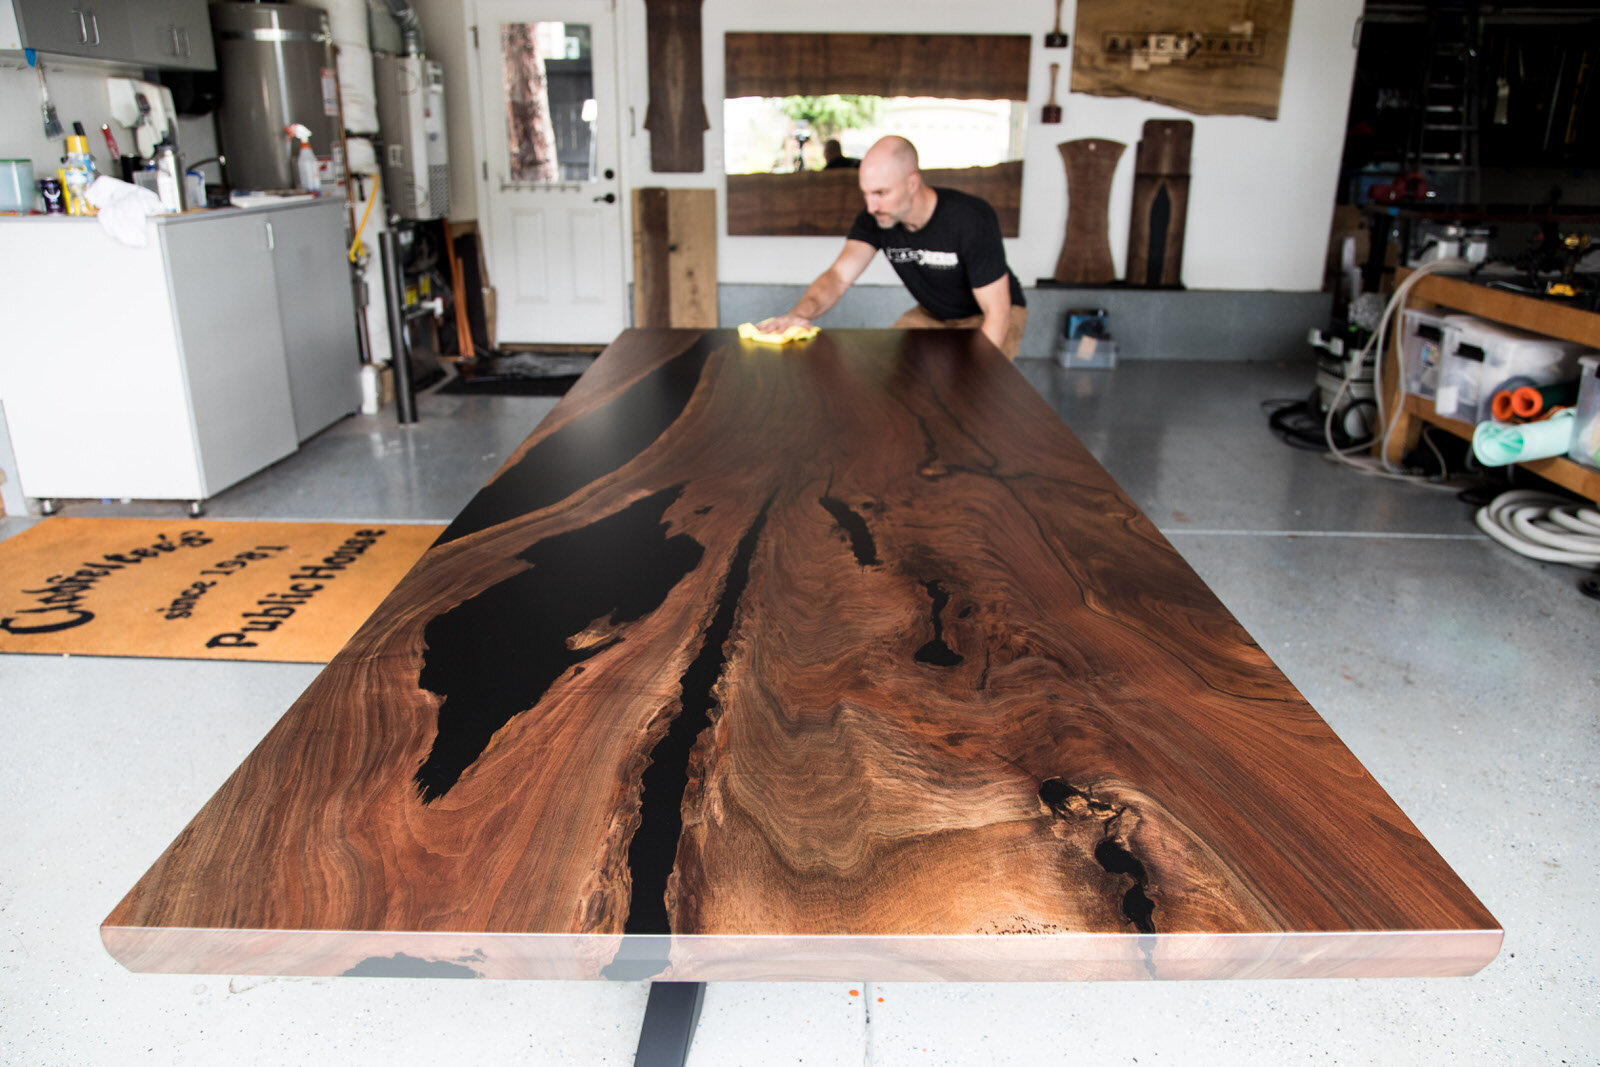
Ok, not literally. But sanding is the most important part. Rubio is in the “hardwax” family. Where a varnish or polyurethane gets its protection by building a thick plastic like layer. Hardwax finishes bond with the wood, and have excess finish removed. What results is a beautiful natural finish that lets you feel every grain. The downside is that it also lets you see every sanding flaw. Where a varnish like finish will cover up a lot of sanding flaws with a thick clearcoat. This is true for solid wood tables, but is accentuated even more with wood and epoxy tables. Tip: If you want to get good as sanding wood, sand a lot of epoxy. You will see how poor sanding patterns develop and notice swirls and pigtails much easier. You will also see what happens if you skip grits or move too quickly between grits.
Water pop drying
One downside (in my opinion) of Rubio is that they really limit you in how high you can sand and still get guaranteed protection. I have found a way around this though, more on that later. Rubio says you can sand to 180 grit, maximum. I start with 100 grit right off the planer or wide belt sander. Sanding the entire piece thoroughly. For a more detailed dive into sanding, check my sanding blog out here.
After 100 grit you will want to “water pop” the entire piece to raise the grain. You can do this by wiping with a wet rag, or spritzing with a spray bottle of water. Allow to air dry after. Rubio only suggests water popping before the final grit. However Stumptown Reclaimed said he noticed a considerable difference in the look and feel of his pieces when he popped between every grit. So you will continue to sand with grits, 120, 150, and 180. Water popping after 100, 120, and 150.
Its is a good idea to draw a grid on your piece with a pencil to enable you to see where you have sanded and where you haven’t. Although the raised grain will make it pretty evident even if you don’t mark your grid. Also, try and be fairly random in your sanding. With the grain one grit, across it the next grit, maybe circular patterns in between. Just don’t do it exactly the same each time or you will see patterns emerge when you add your finish. If you are under the impression you can only sand with the grain, that doesn’t apply if you are using a random orbital sander. The randomness takes care of that.
Clean before finish
Rubio recommends a clean surface before finishing. It doesn’t need to be as clean as if you were spraying a grand piano with lacquer. Just decently clean. First, blow of the top with compressed air to remove the bulk of the dust. Then clean the top with a rag damp with Rubio raw wood cleaner, or Acetone in a pinch. I used mineral spirits in my video, but Rubio reached out to me directly to say they don’t recommend mineral spirits. Allow the cleaner to air dry completely.
applying the finish
This is the easiest part of the whole process. Especially compared to other finishes. It is also the most fun. Rubio can be used by itself or with the accelerator. My understanding is the results are the same with or without the accelerator, it is just fully cured in a week with the accelerator, or three weeks without. If you use the accelerator, mixing can be a little daunting. You don’t want to make too much and have it go to waste. Then again, you don’t want to get 90% done and run out. So play around with your quantities. Stumptown says 30ml will cover a 84x36” oak table. While walnut can be a little thirstier. Which brings me to another point, Rubio goes a lot further than other finishes. It might seem expensive, but it is probably cheaper on a square footage basis than a box store poly finish.
Some of you out there might not even know you need to finish the bottom of your table. I have seen too many tables sold by “professionals” that didn’t even finish the bottom. So first and foremost, finish all six sides. Top, bottom, and every side. One thing I do that I am not sure everyone does, is finish the bottom then immediately flip and finish the top. You probably think this will leave marks on the bottom. And you are right. I like to elevate it slightly on some pucks, but there will still be marks where it rested on the pucks. These can sometimes be buffed out with a white pad, or refinished after the top is mostly cured. The reason I do this is to minimize the chance of a top warping. Finishing only one side will allow the other side to absorb moisture from the air and it can cup relatively quickly.
I prefer to spread the Rubio on using a bondo spreader. I like the idea of the Rubio getting pushed into each and every grain. Where if I applied only with a buffing pad the finish could potentially remain only on top. I haven’t tested this theory though, its just a hypothesis for now. Try and move fairly quickly. You only have about 15 minutes before the excess needs to be removed. You can also leave streaks in your wood if you leave an area partially finished for too long. So trowel it in quickly, then move to a white floor pad to buff in the sides and any spots you might have missed. You can either buff by hand or with a power buffer like my Gem buffer/sander. Unlike my Osmo finishing guide, I don’t feel like a Gem buffer is required though. If an area looks dry, buff in a little more. Do this for 5-10 minutes. After you have the piece fully saturated, wipe off all excess with a cotton towel or blue shop rags. Rubio says “You can’t wipe too much off, but you can leave too much on.” So that seems pretty clear. Wipe all of it off.
Rubio says you can come back with a clean white pad on your buffer and buff the piece immediately after wiping off excess oil. This is optional, and is said to help bring out more sheen. I have a method for adding a second coat of Rubio, so I wait to to this until after the second coat.
Adding a second coat of a monocoat?
The name is Rubio Monocoat, so doesn’t that mean one-coat?… Yes, it does. Most of the time. Let me elaborate.
Rubio prides themselves by being the finish that only needs one coat. And that is true, Rubio achieves great protection from only one application. So if you followed my initial steps and you are happy with you piece at this point, you are done! However if you feel your piece is a little too matte, and/or if you would like to even out an uneven sheen (particularly on an epoxy portion), read on.
Rubio says it protects so well that it won’t even bond to itself. I haven’t found this to really be true. You can wipe on another coat without doing anything and it won’t bead off. It just might not look perfectly even. I discussed applying a second coat directly with Rubio and they gave me some pointers. They recommended sanding lightly with a maroon non woven pad before adding a second coat. This scuffs up the finish and wood fibers enough to allow the second coat to really bond properly.
24 hours (or more) after the first coat I take a rectangle maroon pad and cut it square to fit my Festool sander. You could also buy the Festool Vlies pads. They are just a little expensive. Don’t get lazy here. You need to sand just as carefully as with any grit. Maybe even better. You want to sand lightly and evenly across your entire piece, even the sides. Any area you miss will not match the sheen of the rest of the table. Pay attention to the pattern and use a bright light and/or a light stick to examine your progress. If any area looks uneven, keep sanding/feathering it in until your whole piece looks as uniform as possible. Check out my video or examples of this.
After sanding with maroon pad. Nice and even, frosted look.
After you piece is sanded with the maroon pad, blow off all the dust and wipe with a micro fiber towel. Trowel in another coat just like before. You will find it takes far less finish this time around. Again, buffing in if you have access to a buffer. Wait 10 minutes and remove all excess, just like before. This is when I opt to use the clean white pad to buff the entire table to bring up the sheen slightly.
Rubio recommends a coat of their maintenance oil 48 hours after finishing to give about a 5% bump in sheen. Which can of course be applied after the first coat instead if you are not adding a second coat. I am not sure how much of a difference I noticed from the maintenance oil following two coats of Pure 2c.
maintenance and care
I recommend always starting with a clean paper towel or micro fiber first. Wipe up any spills as soon as you notice them. If you need a little more cleaning power I then recommend a damp towel. Finally, any stubborn stains should only be cleaned with the Rubio soap and water mix. It is specifically made for their finish and wont break it down in any way. Unlike some harsher commercial cleaners.
If you find your finish dulled after a couple years of regular use/cleaning with harsh chemicals you might want to give it a quick refresh with their maintenance oil. They say anyone can simply wipe it on and wipe it off. I opt to buff it in with my Gem and a clean white pad, but that’s just cause I’m lazy and have cool tools.
that’s it! comment with any questions or suggestions you have had success with!