
THREE WAYS TO FLATTEN YOUR SLAB, AND WHICH IS BEST
Live Edge For Beginners - Planing, Surfacing, Just Getting It Flat
So you found your perfect slab, ensured it is dried properly to your climate, and you’re finally ready to get it prepped and finished for daily use. These last few steps are every bit as important as the steps we discussed in part one and two of this series. So don’t get impatient now. In this article we are going to discuss the different ways you can get your slab flat and ready for sanding and finishing
From the top
You have bought a nice live edge slab from a local supplier, or other source. But maybe one side is still roughsawn (right off the bandsaw, no planer). The first thing you need to do is get your piece surfaced so both sides are nice and flat. There are a few ways you can get your piece ready for sanding and I will discuss each of them below.
Planer:

Planer at Creative Woodwork NW gobbling up a big one
A large planer or wide belt sander is my first choice. By a long ways. It delivers the best finish, which means the least sanding for you. It also works the fastest of any of the methods I’ll discuss. Therefore it is likely the cheapest option. You simply run your slab through the planer at a commercial shop, alternating sides, until you have a smooth piece of wood with no low spots. Marking a grid with chalk is a good way to track your progress and ensure you get the entire face.
The downside to using a planer is that you need a pretty flat slab to begin with Just like when planing any board, if you send a curved board into a planer, what comes out is a thinner curved board. The same generally goes for planing twisted and cupped slabs. Normally to remove twists and cups, a decently equip shop will run one side of a board over a jointer, then the other through the planer. Resulting in a perfectly flat board. The problem with live edge slabs is that many are far too big to fit on a jointer.
The commercial shop I rent time out has an exceptional 50” planer that also has two wide belt sanders built in. So your slab get planed, sanded to 80 grit, then sanded to 120 grit, all in one pass. Oh, and the sanders oscillate. So it leaves a remarkably good finish when its done. Its also does and amazing job at removing those twists and cups better than any planer I’ve used. So more often than not, I am able to put any slab though this planer and have it come out perfectly flat on both sides. The downside for most of you, is that these planers cost over $50k, and are completely out of the reach of most everyone reading this.
So my recommendation is to first ask your slab supplier if they can flatten both sides for you. With any luck they have a similar planer or wide belt. If that isn’t an option, read on below.
CNC

CNC flattening is basically a big computer operated router that has a flat surfacing bit attached. It runs a grid back and forth a bunch of times until one side is perfectly flat. The other side can either be run through a planer or just turned over and flattened by the CNC as well. This is especially useful for those slabs that are too twisted to run through a planer. It essentially acts like a huge jointer, so slab is too twisted/warped/cupped to be flattened by a CNC. Although if its super warped, you could end up with a pretty thin slab.
The first downside to the CNC is that it doesn’t leave quite as nice of a finish as the planer/sander. Depending on how sharp your bit is, and how good your operator is, the CNC can cause small areas of tearout. Even a great CNC and operator will still leave a pretty evident grid line. These CNC lines are not a huge obstacle to overcome, just a little time consuming when it comes to sanding.
The second downside is that a CNC isn’t particularly fast. You will likely need at least an hour, if not two hours of time on the machine. Since you don’t want to take too much off, but still get it perfectly flat. It is likely the CNC will have to take multiple passes to get it flat. Most shops will charge at least $125/hr for CNC time. So you can see how this would add up. For comparison, I can generally flatten slab on the industrial planer/sander in about 5-10 minutes.
Router Sled
My first router sled made from simple angle-aluminum and wood block
A router sled is in a sense, a cheap homemade CNC when it comes to flattening. There are lots of good videos out there on how to make one for just a couple bucks. I recommend checking out the good video by Matt Cremona below.
The upsides to a router sled are numerous. They are extremely inexpensive. You can store they almost anywhere, and they can be built to any size. So theoretically, you can make a router sled larger than a CNC. I am actually dealing with this now. A client wants an 80” round table, which is bigger than any CNC I know of. So I will likely have to build a giant sled just for this job.

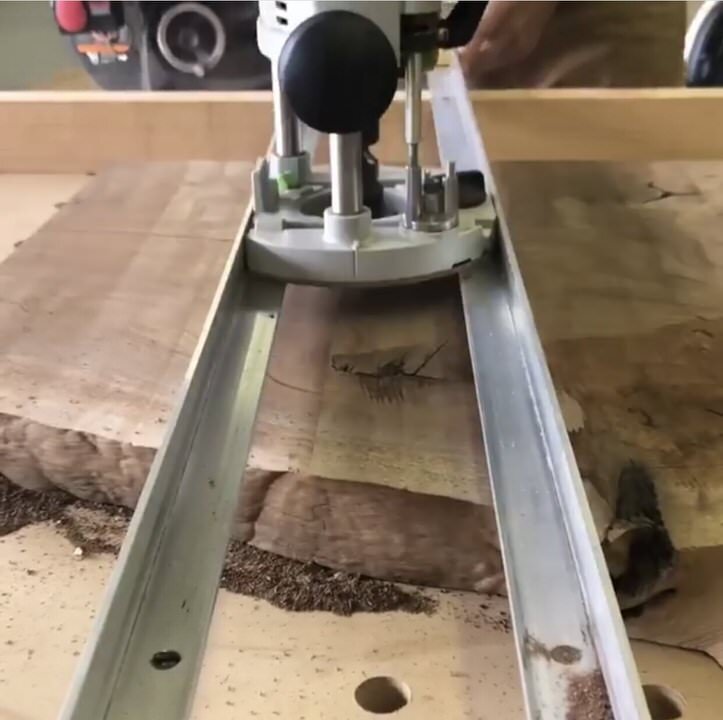
My current Woodhaven sled making a mess
The first downside is the same as the CNC. You will be left with a grid that needs sanding out. Again, not a huge deal. But does take time. The second downside is they are extremely messy. If you router sled with any regularity it is worth it to come up with a good dust collection solution. Finally, they are not quite as precise as a CNC. Depending on how sturdy your sled is, it is possible to sag near the center.
You don’t always have a choice, but if possible you should run your router (or CNC) with the grain. Running with the grain greatly reduce tearout and give you a better finish that will require less sanding. However, as I mentioned that is not always possible. Most router sleds max out at around 60”. So if your piece is longer than that you are going to have to run across the grain. Which isn’t a huge deal, so don’t sweat it too much.
It is also worth mentioning that you don’t have to make your router sled. I bought a Woodhaven 51” sled and use from time to time with good success.