
Rich Tones for a Coffee Table
When building something like the perfect guitar, wood is everything. The simplistic charm of Poplar for a telecaster, or the exclusivity of a Taylor Swift signature Taylor, built with a wood that grows only at certain altitude in Hawaii, called Koa. There are certain materials that make a project shine and Bastogne is no exception. Bastogne is the love child of Claro and English Walnut, two hardwoods that in their own right’s radiate midnight tones and interesting swirls of woodgrain texture. Typically this kind of wood is reserved for artisanal guitar builds, so when you come across enough of it to make a beautiful coffee table for an upcoming project: you get it.
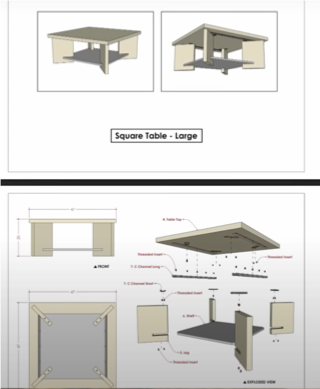
Goal
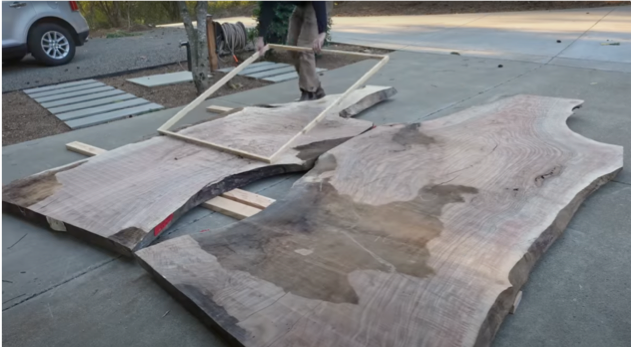
Initially the goal of this project was to build a timeless 50” by 50” coffee table, featuring a wooden shelf at its base. After measuring the Bastogne and speaking with the client, a squared size of 47” was agreed upon, in order to preserve the use of the rare wood. The two large slabs were purchased with a handful of offcuts and the intention was to use the main slab to create the solid table top, while the offcuts would be used to construct the table base and legs.
Change of plans
The preliminary design consisting of a wooden table top, legs, and shelving unit was flipped on its head when the drastic decision to incorporate a metal shelf was made. The client’s specific desire was to use a shelf made of 1” thick, solid aluminium for the tables base layer. Luckily after providing the exact dimensions to a local business called IRC Aluminum , they were able to cut a perfectly sized shelf from a large piece of metal.
Free give-away/Discounted plans
The original design chosen by the client was a sleek, traditional wooden coffee table layout. Feeling compelled to complete the initial build, the decision to simultaneously build a second table was a no-brainer. This entirely wooden table stayed true to the original design, but with smaller dimensions of 30”x30”. It features a refined Mappa burl (black poplar) top, a walnut base, legs and no metal. Because this second build was fuelled entirely by passion, it is up for grabs for free. Enter here to win. For those interested; you can access both sets of table plans (currently half-off) right here!
Wood vs. metal
Something you will notice throughout this video is the difference in difficulty between working entirely with wood versus working with wood and metal. If you want to give yourself a bit of a break and move through your woodworking projects with a little more ease, our recommendation is that you stick with wood.
Price transparency
Blacktail Studio is an educational video series, documenting entire building procedures from the perspective of a solo woodworker who began as a hobbyist. The reason for sharing prices so openly with viewers is to provide an honest depiction
of what exactly goes into these builds and what they are sold for.
Here are a few specifics for this table build: Bastogne slab: $2900, aluminium shelf: $700, finished table: $18,500
Cutting corners
After the size adjustment from 50” to 47”, it was imperative to stay true to the new measurements. However, because some of the corners on the main slab of Bastogne retained a bit of the live edge, they needed to be flushed out. To do this an off-cut of the wood was used to fill in the missing corner sections. It was crucial that the woodgrain matched, so that the attachment of smaller pieces of wood would be seamless. Using wood glue and clamps to set the pieces overnight, flush cuts were made the following day using a Ryoba hand saw.
New technique
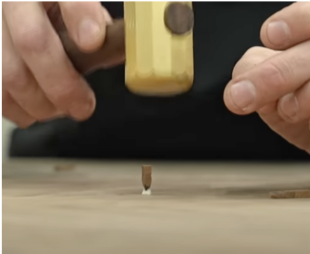
When sawmills process wood they make small holes in the center of the slabs to test moisture levels. Though this is extremely important, it leaves a couple of holes in the wood. Rather than filling this with glue or epoxy, small Bastonge “toothpicks” were cut from the wood and hammered into the holes and shaved down. After the wood was patched and holes were filled, sanding could ensue.
Fitting the aluminium shelf
In order to fit the aluminium shelf perfectly into the wooden base pieces the thickness of the metal and powder coat needed to be considered. On the basis of the powder coat and aluminium being a total of 1.04” thick; the spacers were cut to 1.05”, leaving a very small margin for error. The spacers worked and the notches ended up being a perfect 1.05”. Using tools like the Festool track saw with a carbide blade and the Festool router with an old bit ensured that the corners of the metal matched the width of the legs perfectly.
Finishing workshop (free)

If you are looking to perfect your wood finishing skills: Blacktail studio is currently offering a free online workshop (no catch) for you to access. This in-depth lesson plan focusses on everything from sanding, to proper finishing techniques and will leave you better equipped to care for your upcoming wood projects. Signing up for this valuable workshop also allows you to access and reference its content as often as you need to.

Nerves set in
After all of the powder coating, metal cutting, spacing, planning for leeway and careful finishing it was finally time for the nerve-wracking moment of truth. Will the aluminium shelf fit into the wooden table legs? In short, it fit quite well. Check out this portion of video to see just how satisfying the addition of the set-screws made this attachment.
Reveal

Once the metal shelf had been attached to the legs, the table top could finally be mounted, and the final product was fantastic. The dark shining grain of the Bastogne walnut (protected by Blacktail Studio’s new N3 Nano Finish), accented by the matte black of the thick aluminium shelf, made for an incredibly visually appealing coffee table.
To access all of the specifics on how this table was built, the tools used, why Scott might be hoping for failure, and much more check out the full video here. Also, keep an eye on Blacktail Studio Uncut for a behind the scenes look at how the second table was built.